RSS

Tag Archives: Recipe

Honey & Mustard Rib of Beef

A bottle of Hannaford store brand Dijon mustard.

Image via Wikipedia

Honey & Mustard Rib of Beef

Barbecue Recipe - Honey & Mustard Rib of Beef

1 tbs Schwartz Mustard Seed
2 tbs Dijon mustard
2 tbs runny honey
1.5 kg (3 lb 4 oz ) rib of beef on the bone
1 packet Schwartz Mix for Classic Roast Beef Gravy
Sea salt and black pepper

Place the meat on the grill and cook for 20 minutes. Meanwhile, mix together the Mustard Seeds, Dijon mustard and honey. Season well. Remove the joint from the grill and spread half the mustard mixture over the meat.

Cook the meat uncovered for 30 minutes. Remove the joint from the grill and spoon over the remaining mustard mixture and baste with the cooking juices. Cook for a further 15 – 30 minutes.

For rare beef, reduce this cooking time to 45 minutes. For medium cooked beef, cook for 1 hour. For well done beef, increase the cooking time to 1 hour 15 minutes. Remove the cooked joint from the grill and cover with foil and a clean cloth and leave to stand for 15 minutes before carving. Make up the Gravy Mix following packet instructions and serve with the beef.

Makes 4 servings.

Makes 6 to 8 servings.


Tags: , , , , , , , , , , ,

Holiday Beef Tenderloin

Garlic Cloves This isn't garlic this is onion ...

Image via Wikipedia

Holiday Beef Tenderloin

Holiday Beef TenderloinWrap a tender beef roast in garlic, rosemary, and pink peppercorns and you’ve got a dinner party. Hint: You can roast the garlic a day or two ahead of time while you are grilling something else.


For the paste:

1 whole head of garlic
3 tablespoons plus 1 teaspoon extra-virgin olive oil, divided
1 beef tenderloin, 3-1/2 to 4 pounds
3 tablespoons whole pink peppercorns
2 tablespoons chopped fresh rosemary
2 teaspoons kosher salt
1/2 teaspoon freshly ground black pepper


To make the paste: Remove the loose, papery outer skin from the head of garlic. Cut about 1/2 inch off the top to expose the cloves. Place the garlic head on an 8-inch square of aluminium foil and drizzle 1 teaspoon of the olive oil over the cloves. Fold up the foil sides and seal to make a packet, leaving a little room for the expansion of steam. Grill over Indirect Medium heat until the cloves are soft, 30 to 45 minutes. Remove from the grill and allow to cool. Squeeze the garlic from the individual cloves into a small bowl. Add the remaining 3 tablespoons of olive oil and mash the garlic and oil together with a fork to form a paste.


Trim the tenderloin of any excess fat and silver skin. Spread the paste on the tenderloin, rubbing it into the meat.


In a small bowl combine the peppercorns, rosemary, salt, and pepper. Mix well and press into the paste on the top and sides of the tenderloin.


Allow the tenderloin to stand at room temperature for 20 to 30 minutes before grilling. Grill over Indirect Medium heat until the internal temperature reaches 135°F for medium rare, 30 to 40 minutes.


Remove from the grill and allow to rest for 5 to 10 minutes. The temperature will rise 5°F to 10°F during this time. Cut into 3/4- to 1-inch slices and serve warm.


Makes 8 to 10 servings.


Leave a comment

Posted by on March 29, 2011 in Barbecue, Beef, Super Bowl


Tags: , , , , , , , , , , , ,

Betty’s Classic King Ranch Chicken Casserole

Capsicum annuum (green bell pepper). Location:...

Image via Wikipedia

In this video, Betty demonstrates how to make a Classic King Ranch Casserole. This dish has been around a long time in the U.S., and this is a simple, basic version. The recipe is influenced by Southwestern cooking, and the dish is quite a lot like an enchilada casserole.

Ingredients:

12-oz. package frozen 3-pepper and onion blend (You may substitute 1 chopped onion plus ½ chopped green bell pepper, ½ chopped red bell pepper, and ½ chopped yellow bell pepper.)
2 tablespoons extra virgin olive oil
3 cups cooked chicken, chopped or shredded (I cooked 3 salted chicken breasts in a slow cooker for 4 hours—no water added– and then chopped and shredded them.)
10 ¾-oz. can cream of chicken soup
10 ¾-oz. can cream of mushroom soup
10 ¾-oz. can chicken broth
10-oz. can diced tomatoes and green chiles, undrained (Rotel brand is quite often used.)
1 teaspoon chili powder
½ teaspoon garlic salt
(10) 6-inch corn tortillas, cut into 1-inch squares
2 cups shredded sharp Cheddar cheese
cooking oil spray

Heat 2 tablespoons olive oil in a deep saucepan over medium heat. Add frozen 3-pepper and onion blend and sauté until softened. Drain and transfer to a large mixing bowl. Stir in 3 cups cooked chicken, a 10 ¾-oz. can cream of chicken soup, a 10 ¾-oz. can cream of mushroom soup, a 10 ¾-oz. can chicken broth, a 10-oz. can diced tomatoes and green chiles, 1 teaspoon chili powder, and ½ teaspoon garlic salt. In a 13-inch by 9-inch by 2-inch baking dish that has been sprayed with cooking oil spray, ladle 1/3 of the chicken and soup mixture. Evenly spread 1/3 of the 1-inch corn tortilla squares over the top. Sprinkle 1/3 of the shredded Cheddar cheese on top of tortilla squares. Repeat these 3 layers twice, ending with shredded Cheddar cheese on top. Bake in a 350 degree (F) oven for 30 minutes, or until bubbly and beginning to brown. Remove from oven and serve immediately. YUM!!! I hope you enjoy this recipe! Love, Betty ♥


Tags: , , , , , , , , , , ,

Mini Spiced Apple Tarts with Chocolate

Apples are an all-American success story-each ...

Image via Wikipedia

It’s that time of the year where Christmas lights start going up and families plan their Thanksgiving feasts. A big part of the holidays are apples, more specifically apple pie.. YUM. There’s nothing that can be wrong with a hot, fresh, flaky and juicy apple pie. And what’s better than just a slice- a tart! Just as flaky and yummy but smaller and with CHOCOLATE. Plus at the Thanksgiving table theres GOING to be that family member(s) that doesn’t want to eat too much dessert, or a big slice or they’re watching their weight. So this is the PERFECT addition to your dessert spread!

Petite decadent pastry shells filled with moist apples, brown sugar, spices and zest topped with lucisious chocolate and the only things left to complete the deal is your hand and mouth! I swear by Williams & Sonoma Basic Pastry Dough recipe because it’s easy, fast and super tasty. I just tweek it a bit of course!

OF COURSE I used my AMAZING Babycakes Machine and the tarts  they came out so cute and petite! However, these can be done in regular mini-muffin tin pans.

Basic Pastry Dough:

Spiced Apple Filling:

  • 4 green apples– peeled and cubed small
  • 2/3 cups firmly packed dark brown sugar
  • 2 tbsp all-purpose flour
  • 1 tsp vanilla extract
  • pinch salt
  • 1 tsp cinnamon powder
  • 1/4 tsp freshly grated nutmeg (fresh is so much better!)
  • 1 tsp lemon juice
  • 1 tbsp fresh orange zest
  • pinch clove powder
  • PAM Baking Flavor

Chocolate Drizzle:

  • 3-4 bittersweet chocolate squares (I used Ghiradelli)
  • 2-3 tbsp half & half (I used fatfree Land-o-Lakes)
  • 2-3 tbsp warm water

Before Chocolate..

For the Pie Dough:

1. In a food processor add the flour, salt and sugar and pulse until blended. Add the cubed butter and pulse until the butter chunks are small pea sized. While pulsing, slowly dribble in the cold water. Add enough water until the dough has turned into a rough mass.

2. Place dough mixture on a floured counter and form into a 1-2 inch thick disk. Wrap with plastic and place in the fridge for AT LEAST 2 hours.

For the Apple Mixture:

1. In a bowl mixture together all the ingredients listed above. Place aside.

Putting it together..

**If using a conventional oven, preheat to about 375. Spray the muffin tins.

1. After 2+ hours, remove the dough from the fridge onto a floured surface. Using a rolling pin, roll out into a thin pastry sheet (just before its thin enough to see through! Using a round 3 inch cookie cutter or a knife, cut out circles. Regardless of whether you’re using the babycakes machine or regular muffin tins, make sure to SPRAY them. Line each cup with the circles of dough pressing lightly into the cup to create a tart shell. If using babycakes machine, use the pie tart tool to press into the cups. Bake for about 5 minutes or until the shells are slightly cooked and slightly golden.

2. Remove the tins from the oven/ open the babycakes machine lid. Add enough apple filling to come over the top of the tin a little. Bake for another 8-10 minutes, or until apples are soft and crust is golden brown and crispy. Remove each tart from the tin/babycakes machine and let cool on a rack.

Pouring the Drizzle..

1. Heat chocolate in a microwave safe bowl for about 45 second. Pour in milk and 1 tbsp of water. Heat for another 30-40 second. Stir and if not melted, add another tbsp hot water and heat for another 30 second. Stir until smooth and glistening. You want the consistency to be a bit thin so you can drizzle the tarts.

2. Using a small whisk or spoon (I used a spoon) drizzle the tarts in a fast back and forth motion until tops are covered. Cool until chocolate is hardened.

Makes about 20 tarts

Serving Suggestions:

Hot with fresh whip cream and chocolate curls

Hot with fresh vanilla or dulce de leche ice cream

Hot with a nice cup of coffee

Wanna See More Recipes Using the Babycakes Machine?


3 Comments

Posted by on March 25, 2011 in Baking, Chef Priyanka, Fruit, Sweets


Tags: , , , , , , , , ,

Creamy Maharashtrian Chole

Small tomatoes in Korea

Image via Wikipedia

Chole is a classic Indian dish. However, not many people know that chole is made differently across different parts of India. For example there’s Gujurati style chole, which is served in a traditional ‘thali,’ South Indian Chole, which uses curry leaves, and Maharashtrian Chole, which is served in parts of Mumbai. Traditionally, Chole is made with Ghee (India clarified butter) and oil/butter, but that’s not very healthy or necessary to obtain an authentic taste. Plus the addition of reduced-fat sour cream adds a rich creamy taste without the excessive amount of fat!
We usually make 2 types of Chole at home- a creamy version and a more sauteed version. This is the Creamy Chole recipe, which I prefer, because it tastes so heavenly and you feel like you’re eating something that took hours to cook, but its so easy, you can make it every week!
  • 1 can chick peas (I use Goya)
  • 1 medium sized onion- diced
  • 1 beefsteak tomato- diced
  • 1 tbsp black mustard seeds
  • 1 tbsp garam masala
  • 3 cloves garlic– crushed and minced
  • 1/2-1 tbsp freshly grated ginger
  • 1/4 cup sour cream (I used reduced-fat Breakstones Brand or use Vegan Substitute)
  • 1 tbsp turmeric
  • 1 tbsp chili powder (or to taste)
  • couple tbsp water
  • salt- to taste
  • coarse black pepper- few grinds
  • half bunch cilantro– minced
  • 1 red onion- cut into thick rounds (for garnishing)
  • 3-4 sweet peppers- for garnishing (optional)
  • PAM- original
  • 1 tbsp vegetable oil

Tools: Medium/Large non-stick skillet, spatula

1. In the skillet over medium-high heat spray with PAM and pour oil. Add mustard seeds, and cook until they are fragrant and “pop” about 30 seconds to a minute. Add onions, garlic and ginger and saute for about 2-3 minutes until slightly brown/golden. Add the diced tomatoes and saute for a few more minutes. Add garam masala, turmeric, chili powder. Once the onions are caramelized and the tomatoes soft, add the chickpeas and combine with the onion-tomatoe mixture until well coated.

2. After about 2-3 minutes add the sour cream and cook until everything is well combined. Add salt and pepper, taste. Cook until chickpeas are soft and flavored well. Make sure to taste a few times for salt and masala. If it’s too thick, add a few tbsp of water (consistency should be creamy, gravy-like, not too thick).

3. Once the gravy has thickened, chickpeas are cooked well and you’ve tasted for salt/masala, remove from heat and mix in 3/4 of the reserved chopped cilantro. Clean the pan and set back on medium-high heat. Spray with PAM and the thick red onion slices and small sweet peppers. Saute on medium-high heat until onions are charred and soft (without breaking circular shape). Place chole in a nice serving dish and top with remaining cilantro, onions and peppers. Serve with Basmati rice, chapati or naan.

Serves 4-6

Nutrition:

The 2 ingredients in this Chole that contribute the fat/calories to this dish are: 1 tbsp oil (14 grams of fat/140 calories)

1/4 sour cream (3.5 grams of fat per 1 tbsp/40 calories)

Want to see more recipes using Garama Masala?

Indian Sloppy Joe (Pav Bhaji Recipe)- Vegan


Tags: , , , , , , , , ,

Vegetarian Thanksgiving Menu with Some Exotic Flavors

A slice of homemade Thanksgiving pumpkin pie s...

Image via Wikipedia

Thanksgiving, historically and traditionally, is about giving thanks to friends, family (and back in the day God) for everything that we have. There is nothing in there that says- to display your thankfulness eat a turkey. Therefore, the concept of Thanksgiving is not about the bird, it’s about being thankful for what you have and giving back to people. What’s the best way to express that than saving a birds life and making your Thanksgiving vegetarian (or vegan)?! After hearing my menu, you won’t even realize that the turkey is missing, cause the selections are just that good! Take a look at what I’m making (full recipes & pictures coming Friday!):

My Vegetarian Thanksgiving Menu-

  1. Roasted Garlic Mashed Potatoes with Rosemary, Chili & Chives (can be made Vegan)
  2. Baked Sweet & Spicy Sweet Potato Fries (Vegan)
  3. Herbed Brioche Stuffing with Walnut & Figs (and I’m baking a fresh loaf of Brioche!)
  4. Individual Acorn Squashes stuffed with Indian Biryani & Caramelized Onions (for those picky eaters AKA my Daddy) (Vegan)
  5. Homemade Dulce de Leche Ice Cream- drizzled with Fresh, thick Caramel
  6. Poached Pears with Brandy & Cranberries (Vegan)
  7. Pecan Pie
  8. Pumpkin Pie

I can’t WAIT to get started! It’s going to be a yummy and healthy Thanksgiving! So put your bib on, cause there’s going to be a lot of eating goin’ on! Oh, also notice that half of my menu items are vegan/can be made vegan! YUM :)


Leave a comment

Posted by on March 25, 2011 in Chef Priyanka


Tags: , , , , , , , , ,

Homemade Brioche Loaf Recipe

Egg yolks.

Image via Wikipedia

I don’t think I’ve ever actually made homemade bread..well actually my parents used to way back in the day when we bought this toaster oven that was also a bread maker (yes, very clever invention). Other than that I usually buy my bread from a bakery or regular supermarket- I’m a little too lazy to sit there kneading dough and all that. But I was in DESPERATE need for a loaf of Brioche for my Herbed Fig & Walnut Brioche Stuffing, but apparently all the Italians on Staten Island (nor the Panera) don’t make Brioche!! I searched in multiple supermarkets, called various bakeries and stalked the Panera website to see if they have a loaf similar to brioche. But everything was either too complicated and fruity or it simply wasn’t available!

My mother was trying to persuade me to make another kind of stuffing, but I was too set on making this yummy Brioche stuffing to give up on my main ingredient! Then I decided, wait I cook, I bake, why don’t I just MAKE a loaf of Brioche? To my surprise, the recipe is SUPER simple, and literally contains ingredients that are staples in a household. Butter, milk, sugar and eggs (I had to buy the yeast, but no biggy!). It’s simple and really delicious- so good that I was tempted to eat it right then and there instead of making my stuffing with it! So, here we go!

Simple Brioche Recipe:

  • 1 2/3 cup All Purpose Flour
  • 1 tbsp wet yeast, crumbled (or dry-bakers yeast is fine) I used wet because that’s all my deli had!
  • 6 tbsp unsalted butter, room temp cut into pieces (yes, this obviously is not one of my healthy recipes)
  • 2 large eggs, room temp
  • 1/3 cup warm milk (I used Skim Plus)
  • 2 tbsp sugar
  • pinch of salt
  • 1 egg yolk with a dash of sugar (for the glaze)
  • PAM baking flavor

Tempted yet?

No fancy tools here- I used my hands!! You can use a mixer attached with a dough hook. You DO need a loaf pan though.

1. In a large bowl add flour and yeast and mix well. Create a hole in the middle of the flour mixture.

2. Slowly dribble the warm milk into the middle, while mixing the dough in with your finger tips. It’ll form into rough dough pieces.

3. Add the salt and sugar and combine well. Add the soft butter piece by piece, mixing well after each addition with your fingers. At this point I started to knead the dough to make sure each piece of butter was incorporated well.

4. Once all the butter is incorporated, add each egg ONE AT A TIME, and knead into dough. Mix well before the 2nd egg, making sure all the white and yolk and combined into the dough. Dough will be very sticky and wet. Knead and mix until the dough becomes and elastic and pulls away from your fingers and bowl. Cover bowl tightly with plastic and set in a warm place to rise. I put mine in the oven (it was off obviously), so no drafts hit it.

After 2 hours..

5. By now it should have doubled in size. Mix and knead the dough for 10 minutes. Rip into 4 even sized balls. Spray loaf pan with PAM and place the 4 balls in a row. Cover with plastic wrap and set in a warm place to rise again.

After 1 hour..

6. Preheat oven to 400 degrees.

7. In a small bowl mix together yolk and sugar. Using a pastry brush, gently brush the tops on the rolls. Using a scissor, cut small vents on top of each roll.

8. Bake at 400 degrees for 10 minutes. Turn the temperature down to 350 and bake for another 20-30 minutes until top is golden brown and shiny and an inserted toothpick comes out clean. (I baked mine for 25 minutes). Remove and cool before slicing/serving.

Makes 1 standard size loaf

 
1 Comment

Posted by on March 25, 2011 in Baking, Chef Priyanka


Tags: , , , , , , , , , , , , ,

Homemade Dulce de Leche Ice Cream with Fresh Dulce de Leche

Merengue dulce de leche

Image via Wikipedia

I don’t know how else to describe this ice cream, but other than decadent goodness (with not as much fat as you might think!) Also it’s not that difficult to make and its definitely a crowd pleaser. I made it for Thanksgiving to accompany our Pecan and Pumpkin pies and it was heavenly.

Creamy dulce de leche flavored ice creamed dripping with thick, caramel colored fresh dulce de leche- what could be better! Plus, you can make a huge batch and store it in the freezer! Yummy! I eat mine topped with raspberries, blackberries or strawberries. Also a scoop of this decadence tastes delicious in some homemade Iced Coffee Frappacino!

Furthermore, traditional Dulce De Leche ice cream is made with egg yolks for that custardy and creamy texture. However, I found my EGGLESS recipe to be just as good and creamy and HEALTHY (well healthier!). Anyways on to the scrumptious, creamy, amazing goodness of Homemade Dulce De Leche Ice Cream:

Ice Cream:

  • 1 cup heavy cream (yes I know, not healthy but this is the fattiest portion of the dish, and it makes about 3-4 cups of ice cream!)
  • 1 cup milk (I used skim plus)
  • 1 cup fatfree half & half (I used Land-o-Lakes Brand)
  • 4 tbsp sugar
  • 1 cup Homemade Dulce de Leche (Recipe BELOW)

1. In a heavy, large sauce pan heat together the heavy cream, milk and half & half over medium heat. Whisk int he sugar to dissolve. Once the mixture comes to a boil, remove from the heat and stir in 3/4 of the Dulce de Leche.

2. Cool COMPLETELY in the fridge for at least 2 hours. Don’t make the mistake of cooling over an ice bath and popping it into the ice cream maker- it won’t churn properly! (Trust me I’ve done it before).

3. Once cooled, prepare in your ice cream maker as the instructions state in the manual.

Towards the end, right before the ice cream is thick enough to your desired texture, drizzle in remaining dulce de leche to create swirls-

yes I was drooling at this point. Transfer to an air tight container and chill in the freezer until ready to serve.

Makes about 4 cups

Homemade Dulce De Leche:

  • 2 cups milk (I used skim plus)
  • 2 cups fatfree half & half (I used Land-o-Lakes Brand)
  • 1 vanilla bean- split with the seeds scraped out.
  • 1 1/2 cups sugar
  • 1/4 tsp salt
  • 1/2 tsp baking powder

See all those specs of Vanilla Beans.. YUM..

1. In a large heavy pot pour the milk, half & half, sugar and vanilla bean & seeds and heat over medium heat. Bring to a simmer, stirring occasionally until the sugar is dissolved. You do NOT want to BOIL the mixture!

2. Once the sugar is dissolved add the baking soda and stir. Lower heat to LOW and cook stirring occasionally. You want the mixture to be BARELY simmering. This is a slow process, so some patience is required :) Cook for 1 HOUR.

3. After 1 hour, remove the vanilla bean and cook stirring occasionally for another 2 hours until you’ve achieved a medium-dark caramel color. It should reduce to about 1-1 1/2 cups.

4. Once you’ve achieve the color and thick texture (be careful it splatters a bit while you stir, and you don’t want to be burnt by HOT sugar!), remove the mixture from the stove. Over a heat proof bowl with a fine write mesh strainer, strain the dulce de leche. Cover with a lid/plastic wrap and store in the fridge until ready to use.

Makes about 1-1 1/2 cups

Like Eggless Desserts? Check out these!

Eggless Tiramisu infused with Amaretto

Chiroti- Indian Dessert sweetened with Cardamom & Saffron

Mini Apple Pie Tartlets with Chocolate


Tags: , , , , , , , , , , , , ,

Baked Sweet & Spicy Sweet Potato Fries

Picture of fries made from sweet potatoes.

Image via Wikipedia

by chefpriyanka
I love fries- who doesn’t! You’re only LYING to yourself if you say that you don’t like fries. I don’t eat fries because they’re deep-fried and unhealthy. Of course if someone handed me a nice crispy curly fry or waffle fry, I wouldn’t be able to refuse! However, I don’t like getting that greasy, fatty feeling that I generally get after eating deep-fried food; another reason why I avoid fried items!
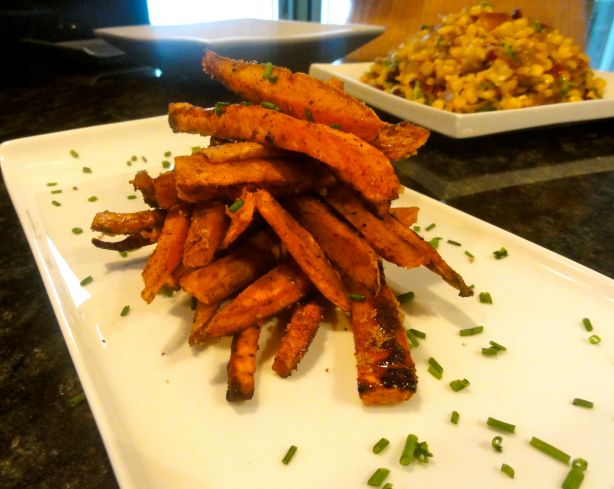
But, this weekend I made some sweet & spicy sweet potato fries that were amazing- crispy, light, salty, sweet, spicy what can be better than that! Plus, sweet potato is generally low in calories (~150/medium potato) and high in Vitamin A and Dietary Fiber. Baked crisp with melted brown sugar and spicy cayenne- believe me the combination is delicious!
Baked Sweet & Spicy Sweet Potato Fries:
  • 3 sweet potatoes- washed & scrubbed
  • 3 tbsp dark brown sugar
  • 1 tbsp cayenne pepper
  • 1/2-1 tbsp smokey paprika
  • 1/2 tbsp extra virgin olive oil
  • coarse black pepper– few grinds
  • salt- to taste
  • 1 tbsp dark brown sugar (for garnishing)
  • few sprigs of chive- finely chopped
  • PAM olive oil flavor

1. Preheat oven to 425. In a small bowl whisk together oil, pepper, cayenne pepper and paprika.

2. Cut the potatoes into strips (french-frie size) and lay them on a baking sheet. Pour oil mixture over potatoes and toss until evenly coated. Spray with some pam and make sure each strip is hitting the baking sheet. Sprinkle with brown sugar evenly over potatoes.

3. Bake for 30-35 minutes until darker and crispy, tossing every 10 minutes. Remove and cool. While cooling, sprinkle with remaining brown sugar and garnish with chives. Serve with your favorite dipping sauce- I recommend Honey Mustard YUM :)

Serves 4

Look at those crispy fries sparkling with brown sugar.. yummy..


Want MORE Vegan?

Tandoori Tofu Masala “Salad”

Roasted Garlic Baba Ghanoush

Indian Sloppy Joe (Pav Bhaji)

…and more..

Nutritional Info


Tags: , , , , , , , , , , , , ,

Roasted Acorn Squash Stuffed with Vegetable Biryani (Indian Spiced Rice)

Cashew nut snack, roasted and salted

Image via Wikipedia

Christmas is around the corner (trust me it’ll creep up on you really fast, so you better have your gifts ready :-D ), and I like to add a little Indian flair to my Christmas Eve dinner. Ok, I’m obviously not Christian, but being born and brought up in Staten Island, I can say I know a thing or two about Christmas festivities and how important it is, religiously speaking. However, I tend to use Christmas as an excuse to indulge in food and gifts- yes, I’m still a child and there is NO shame in that! For some reason squash reminds me of the holidays- maybe because it’s all over the supermarket in ridiculous quantities and they’re pretty cheap! Just look how cheap you can get some Acorn Squashes at Freshdirect averaging around $1.24 for 1! While using this inexpensive vegetable, I decided to put my Indian twist on Stuffed Acorn Squash.
I roast the squash with some masalas, scoop it out and toss it with Spicy Biryani along with cashews and saffron. It has the perfect winter touch with warm flavors of clove, cardamom, cinnamon and spicy masalas- it’s sure to keep you cozy on a cold snowy day! Biryani by the way is a traditional spicy-roasted basmati rice, served in different varieties across India. It comes in Chicken & Lamb Biryani, but we’re not too concerned with that here :-P . Actually, Wikipediahas a pretty good definition of it! Did I mention this dish is Vegan– yes, I know amazing! So why don’t we get started on my Indian inspired Christmas dish?!
Roasted Acorn Squash Stuffed with Vegetable Biryani:
  • 4 acorn squashes cut in half, gutted
  • 1/2 cup basmati rice soaked in water
  • 1 cup water
  • 2-3 tbsp garam masala (click for a homemade recipe or store-bought is fine)
  • 1 medium red onion- diced
  • 3-4 small sweet peppers- diced
  • handful cashew nuts– chopped a bit
  • pinch of saffron
  • handful cilantro– finely chopped
  • 3-4 tbsp biryani paste- recipe BELOW (or store-bought)
  • 1 medium onion- cut into thick slices (garnishing)
  • salt to taste
  • coarse black pepper
  • PAM original flavor
  • 1 tbsp vegetable oil

1. Preheat the oven to 400 degrees. On a baking sheet place the squash halves, spray with PAM and sprinkle with 1-2 tbsp garam masala. Place in the oven and BROIL till tender and charred- about 10-15 minutes.

2. While the squashes are roasting, in a large skillet, spray with PAM and add vegetable oil and set over medium heat. Add the cashews and saute until fragrant and slightly darkened. Add onions and peppers, sprinkle with black pepper and saute until soft, about 5-7 minutes.

Once the onions and peppers are soft, but now brown, add the soaked basmati rice (make sure not to get any water in it!). Saute for 5-7 minutes. You want to toast the the rice.

3. Remove the squash from the oven and cool for a few minutes before handling. Score the squash into small cubes, WITHOUT cutting through the skin. Scoop the cubes out into a bowl and set aside. Keep the shell aside, DON’T throw out!

4. Once the rice is toasted add 1 cup of water, pinch of saffron, cover and cook on medium-low heat, about 15 minutes. You want the rice to be cooked thru, not mushy so don’t mix it around too much! Once the rice is cooked, add the cubed squash, tossing gently (you don’t want the squash to break and mush around the rice). Add the Biryani paste and toss to coat. Mix in 3/4 of the chopped cilantro. Taste for salt and biryani flavor- it should be strong, spicy and aromatic.

5. In a small skillet, spray with PAM and set over medium-high heat. Add onion slices, and saute without breaking up the circles. Cook until brown-ish about 4-5 minutes. Set aside.

6. Fill each squash bowl with rice, just coming over the top. Top each one with an onion round and sprinkle with remaining chopped cilantro. Serve with yogurt or raita.

Serves 4

Biryani Paste:

  • 1 medium white onion- diced
  • 1 beefsteak tomato- diced
  • 3-4 cloves garlic- crushed and minced (click HERE for amazing garlic tips!)
  • 2 tbsp ginger- freshly grated (need help Tackling Ginger?)
  • 1 tbsp chili powder (it should be spicy!)
  • handful chopped cilantro
  • 4-5 hefty tbsp Biryani paste (I use Patak’s Brand)
  • PAM original flavor
  • 1/2 tbsp vegetable oil

1. In a medium skillet, spray with pam, add oil and set over medium-high flame. Add onions and tomatoes, saute until golden-brown about 4-5 minutes. Add garlic, ginger, chili powder and cilantro. Saute until vegetables are soft and fragrant about 4-5 minutes. Add the biryani paste and mix well, making sure all the veggies are coated. Remove from the heat and let cool (10-15 minutes).

2. In a grinder/food processor, add the biryani mixture and grind until smooth (slightly chunky is ok). Store in an air tight container. Can be kept in the fridge for 1-2 weeks, or in the freezer- for a while!

Makes about 1/2-1 cup

Can’t Get Enough Healthy Vegan? Check these out:

Tandoori Tofu Masala “Salad”

Spicy Cumin Potatoes with Green Chili Tofu

Indian Sloppy Joe (Pav Bhaji)

Baked Sweet & Spicy Sweet Potato Fries

Idli & Vada (South Indian Delight)

Creamy Maharashtrian Chole


Tags: , , , , , , , , , , , ,