RSS

Tag Archives: Dinner

Homemade Dulce de Leche Ice Cream with Fresh Dulce de Leche

Merengue dulce de leche

Image via Wikipedia

I don’t know how else to describe this ice cream, but other than decadent goodness (with not as much fat as you might think!) Also it’s not that difficult to make and its definitely a crowd pleaser. I made it for Thanksgiving to accompany our Pecan and Pumpkin pies and it was heavenly.

Creamy dulce de leche flavored ice creamed dripping with thick, caramel colored fresh dulce de leche- what could be better! Plus, you can make a huge batch and store it in the freezer! Yummy! I eat mine topped with raspberries, blackberries or strawberries. Also a scoop of this decadence tastes delicious in some homemade Iced Coffee Frappacino!

Furthermore, traditional Dulce De Leche ice cream is made with egg yolks for that custardy and creamy texture. However, I found my EGGLESS recipe to be just as good and creamy and HEALTHY (well healthier!). Anyways on to the scrumptious, creamy, amazing goodness of Homemade Dulce De Leche Ice Cream:

Ice Cream:

  • 1 cup heavy cream (yes I know, not healthy but this is the fattiest portion of the dish, and it makes about 3-4 cups of ice cream!)
  • 1 cup milk (I used skim plus)
  • 1 cup fatfree half & half (I used Land-o-Lakes Brand)
  • 4 tbsp sugar
  • 1 cup Homemade Dulce de Leche (Recipe BELOW)

1. In a heavy, large sauce pan heat together the heavy cream, milk and half & half over medium heat. Whisk int he sugar to dissolve. Once the mixture comes to a boil, remove from the heat and stir in 3/4 of the Dulce de Leche.

2. Cool COMPLETELY in the fridge for at least 2 hours. Don’t make the mistake of cooling over an ice bath and popping it into the ice cream maker- it won’t churn properly! (Trust me I’ve done it before).

3. Once cooled, prepare in your ice cream maker as the instructions state in the manual.

Towards the end, right before the ice cream is thick enough to your desired texture, drizzle in remaining dulce de leche to create swirls-

yes I was drooling at this point. Transfer to an air tight container and chill in the freezer until ready to serve.

Makes about 4 cups

Homemade Dulce De Leche:

  • 2 cups milk (I used skim plus)
  • 2 cups fatfree half & half (I used Land-o-Lakes Brand)
  • 1 vanilla bean- split with the seeds scraped out.
  • 1 1/2 cups sugar
  • 1/4 tsp salt
  • 1/2 tsp baking powder

See all those specs of Vanilla Beans.. YUM..

1. In a large heavy pot pour the milk, half & half, sugar and vanilla bean & seeds and heat over medium heat. Bring to a simmer, stirring occasionally until the sugar is dissolved. You do NOT want to BOIL the mixture!

2. Once the sugar is dissolved add the baking soda and stir. Lower heat to LOW and cook stirring occasionally. You want the mixture to be BARELY simmering. This is a slow process, so some patience is required :) Cook for 1 HOUR.

3. After 1 hour, remove the vanilla bean and cook stirring occasionally for another 2 hours until you’ve achieved a medium-dark caramel color. It should reduce to about 1-1 1/2 cups.

4. Once you’ve achieve the color and thick texture (be careful it splatters a bit while you stir, and you don’t want to be burnt by HOT sugar!), remove the mixture from the stove. Over a heat proof bowl with a fine write mesh strainer, strain the dulce de leche. Cover with a lid/plastic wrap and store in the fridge until ready to use.

Makes about 1-1 1/2 cups

Like Eggless Desserts? Check out these!

Eggless Tiramisu infused with Amaretto

Chiroti- Indian Dessert sweetened with Cardamom & Saffron

Mini Apple Pie Tartlets with Chocolate


Tags: , , , , , , , , , , , , ,

Baked Sweet & Spicy Sweet Potato Fries

Picture of fries made from sweet potatoes.

Image via Wikipedia

by chefpriyanka
I love fries- who doesn’t! You’re only LYING to yourself if you say that you don’t like fries. I don’t eat fries because they’re deep-fried and unhealthy. Of course if someone handed me a nice crispy curly fry or waffle fry, I wouldn’t be able to refuse! However, I don’t like getting that greasy, fatty feeling that I generally get after eating deep-fried food; another reason why I avoid fried items!
But, this weekend I made some sweet & spicy sweet potato fries that were amazing- crispy, light, salty, sweet, spicy what can be better than that! Plus, sweet potato is generally low in calories (~150/medium potato) and high in Vitamin A and Dietary Fiber. Baked crisp with melted brown sugar and spicy cayenne- believe me the combination is delicious!
Baked Sweet & Spicy Sweet Potato Fries:
  • 3 sweet potatoes- washed & scrubbed
  • 3 tbsp dark brown sugar
  • 1 tbsp cayenne pepper
  • 1/2-1 tbsp smokey paprika
  • 1/2 tbsp extra virgin olive oil
  • coarse black pepper– few grinds
  • salt- to taste
  • 1 tbsp dark brown sugar (for garnishing)
  • few sprigs of chive- finely chopped
  • PAM olive oil flavor

1. Preheat oven to 425. In a small bowl whisk together oil, pepper, cayenne pepper and paprika.

2. Cut the potatoes into strips (french-frie size) and lay them on a baking sheet. Pour oil mixture over potatoes and toss until evenly coated. Spray with some pam and make sure each strip is hitting the baking sheet. Sprinkle with brown sugar evenly over potatoes.

3. Bake for 30-35 minutes until darker and crispy, tossing every 10 minutes. Remove and cool. While cooling, sprinkle with remaining brown sugar and garnish with chives. Serve with your favorite dipping sauce- I recommend Honey Mustard YUM :)

Serves 4

Look at those crispy fries sparkling with brown sugar.. yummy..


Want MORE Vegan?

Tandoori Tofu Masala “Salad”

Roasted Garlic Baba Ghanoush

Indian Sloppy Joe (Pav Bhaji)

…and more..

Nutritional Info


Tags: , , , , , , , , , , , , ,

Roasted Garlic Smashed Potatoes with Rosemary, Chili & Chives

Russet potato with sprouts. Sliced (left) and ...

Image via Wikipedia

Here’s a great holiday side -dish for our next Christmas party! The title is self-explanatory, but this ain’t no typical Roasted Garlic Smashed Potatoes.

  • 4 medium Idaho potatoes– scrubbed
  • 2 heads of garlic– tops trimmed off
  • 4 dried cayenne chilies
  • 3-4 sprigs of rosemary– fresh
  • 1 cup fat free half&half (I use Land-o-Lakes Brand)
  • 1/2 cup light cream
  • 6-7 sprigs of chive- finely chopped
  • 1/3-1/2 cup freshly grated parmigiano cheese
  • salt
  • coarse black pepper
  • PAM olive oil flavor

1. Preheat oven 425 degrees. In a sheet of foil place both garlic heads, chilies, rosemary sprigs, salt and pepper. Spray liberally with PAM and fold foil to create a packet. Bake in oven for about 20 minutes until cloves are soft and rosemary and crispy. Remove and cool.

2. Meanwhile, cut potatoes in half and boil in salted water with peel on until fork tender. In a small bowl squeeze in garlic cloves, add rosemary, chilies, salt and pepper. Mix until well combined and garlic is mushed. Add this mixture to the potatoes and combine thoroughly. In a slow stream, add half&half and light cream. Mash together until smooth and well combined. More or less milk can be used to achieve desired consistency. Then stir in the grated parmigiano. I like smashed potatoes a little chunky and smooth. Taste for salt.

3. Place on a pretty serving platter top with a sprig of rosemary and chopped chives and a drizzle of good extra virgin olive oil (if you want!) Dig in!

Serves 6


Nutrition:

I cut the fat by a pretty substantial amount by using light cream instead of heavy cream and fat free half&half. If you want to keep it completely healthy, use only fat free half&half. The consistency will still come out yummy. I also didn’t put any butter, which traditional mashed potatoes have (it’s really not necessary, because the strong rosemary and garlic flavors keep it yummy)! Plus this dish serves 6, so a little light cream won’t kill you ;)

Like Potatoes? Try these!

Spicy Cumin Potatoes with Green Chili Tofu

Baked Sweet & Spicy Sweet Potato Fries


Tags: , , , , , , , , , , , , , , ,

Chocolate-Chip Cookie Dough Cake Pops

Don’t need much of an introduction for these yummy pops, besides mentioning that they’re CRAZY easy to make and I used a slightly ghetto cake-pop method. What! I wanted cake pops fast and I was tired! Jeez, a chef can take some shortcuts!

Anyways, I used Betty Crocker chocolate Chip Cookie mix and instead of using regular butter, I used Land-O-Lakes 50% less fat butter spread. The result was fluffy cake-like chocolate-chip goodness. Why you may ask did I use buttery spread? Well, since I’m just a little obsessed with being healthy, I decided to cut the fat and calories a bit by using the 50% less fat spread! It was amazing!

Chocolate-Chip Cookie Dough Cake Pops:

  • 1 package Betty Crocker Chocolate-Chip Cookie Mix
  • 1/2 cup 50% less fat butter spread/margarine- at room temperature (I used Land-o-Lakes)
  • 1 egg- at room temperature
  • PAM Baking Flavor
  • 1 cup homemade vanilla frosting
  • 2-3 cups melted dark chocolate (I used Ghiradelli 70% Cacao)

Vanilla Frosting:

  • 2-3 cups sifted confectioner’s sugar
  • 3-4 tbsp milk (I used Skim Plus)
  • 1 tsp vanilla extract
  • 1/2-1 tbsp unsalted butter– at room temperature (Yes, I used real butter for this)

1. Preheat the oven 350 degrees. Spray a large cookie sheet with PAM. In a large bowl add cookie mix, egg and butter. Mix all together until incorporated well and forms into cookie-dough texture. Drop about 2 tbsp rounds onto the cookie sheet. Bake for about 12-15 minutes, until soft, and medium-brown on the bottom. Remove and cool.

2. To make the frosting, in a large bowl add the butter and beat with a hand mixer until creamy. With the mixer on low add in the sifted confectioner’s sugar, increasing the speed as you add more sugar. After you’ve added all the sugar, beat in about 2-3 tbsp milk and vanilla extract. Frosting should be thick and cream (as if you were to frost a cupcake). Pour more/less milk to achieve that consistency.

3. In a large bowl crumble about 3/4 of the batch of cookies. Add the frosting and mix until you’ve reached a crumbly, dough-like consistency. Roll into balls and place on the baking sheet to freeze for about 30 minutes. Before freezing, place a lollipop stick into the balls, so the stick hardens with the cake and stays put. Remove and dip one-by-one into the melted, cooled chocolate. stand up-right in a glass or stick into a styrofoam slab to dry. Eat! I liked mine with a glass of cold fat-free milk :)

 
14 Comments

Posted by on March 24, 2011 in Baking, Chef Priyanka, Chocolate


Tags: , , , , , , , , , , , , , , ,

Chocolate and Almond Biscotti

A bowl of cocoa powder.

Image via Wikipedia

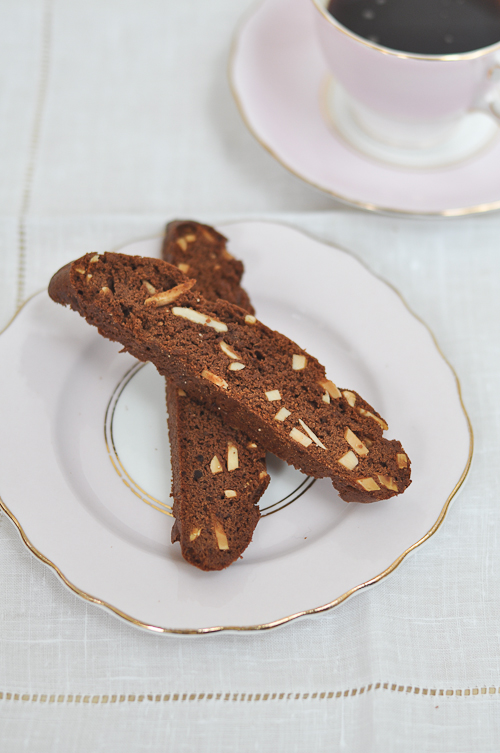
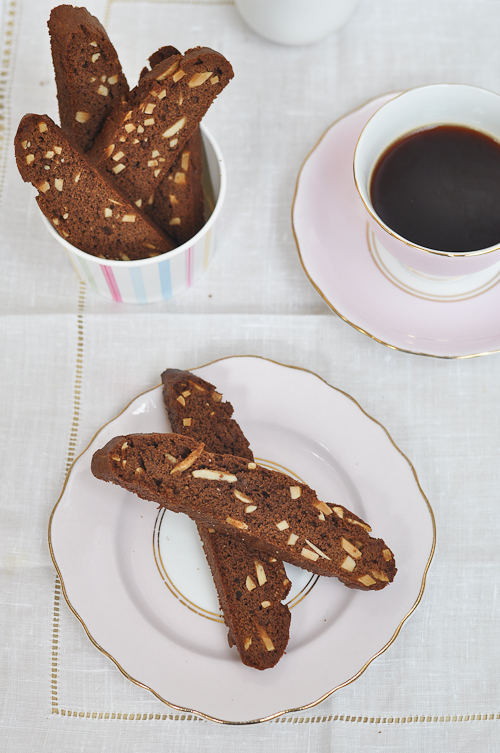
Chocolate BiscottiChocolate Biscotti

A work colleague once asked me if I order in restaurants the same way that I order coffee.  I thought his comment was pretty funny, especially since the weekend before my husband had said I was a waiter’s worst nightmare.

“What do you mean?” I asked my husband.

“Well, you like to change everything in the dish.  You want to order the steamed fish but have them fry it instead, and have the sauce on the side instead of pouring it over the fish – and if it comes with potatoes, you want rice instead!”  He said.

Surely he was exaggerating!

But I did have to concede to my work colleague that being finicky with my coffee never earned me any brownie points with the baristas.  One day I’m having a cappuccino with one sugar then the next I’m having it with one and a half sugars.  Then I learned that you get more milk with a latte so I switched to that (with one sugar).  Then I went off coffee and started having chai lattes – then soy chai lattes, then I missed my coffees and got back on to the lattes – but I wanted a weak latte, one and a half sugars and chocolate sprinkles on top…. oh and extra creamy.

And then I switched to tea – but that’s a whole different story altogether!


The one thing that remains constant though, is my love for a great biscotti.  Regardless of what drink I’m having, a perfectly made biscotti always goes well.  I simply love biscotti as it makes the perfect snack with tea (or coffee), especially since you can store it and bring it out when you have unexpected visitors.  This recipe keeps for up to a week in an airtight container.

I’m especially partial to this Chocolate and Almond Biscotti recipe.

When making this remember the dough is quite soft – so I used some cling wrap to shape the dough and then chilled it in the refrigerator which made handling much easier.

You’ll also want to make sure to have a sharp serrated knife so that when you cut the biscotti.  Remember, aim to cut the biscotti in one go – avoid a back and forth motion so you don’t shatter the loaf.

Chocolate BiscottiChocolate Biscotti

Chocolate and Almond Biscotti

  • 140 grams flour
  • 25 grams Lindt Dutch processed cocoa powder
  • 1 1/2 teaspoon baking powder
  • 1 egg
  • 1 egg yolk
  • 1/4 teaspoon salt
  • 100 grams sugar
  • 60 grams butter
  • 50 grams Lindt Excellence 70% Chocolate, cut into pieces
  • 60 grams almond slivers
  1. In a bowl mix together the flour, cocoa powder and baking powder. Set aside.
  2. In another bowl, using a hand held whisk, beat the egg, egg yolk, salt and sugar. Melt the butter and allow to cool slightly. In a bowl, melt the chocolate in the microwave for around 30 seconds (this will depend on the strength of your microwave)
  3. Add the butter and chocolate to the egg mixture and then add the flour mixture. Fold the mixture until smooth.
  4. Add the almond slivers evenly throughout the batter. The dough should be quite soft.
  5. Line a baking sheet with some cling wrap and place the dough onto the cling wrap and shape into a loaf, around 6 cm wide. Use the cling wrap to shape the loaf. Smooth and even the sides and cover with the cling wrap. Place the baking sheet with the biscotti load in the refrigerator and allow to chill for around 2 hours.
  6. Once chilled, remove the cling wrap and place the loaf in the center of a baking sheet. Pre-heat the oven to 175c (fan forced)
  7. Bake the biscotti for around 30 minutes until the loaf has spread and risen. The loaf should feel firm when pressed.
  8. Cool the load on the pan on a wire rack. When cooled, use a sharp serrated knife to slice the baked loaf, around 1 cm thick.
  9. Return the slices to the baking sheet and bake for 10 minutes. Then turn the slices over and bake for another 8 minutes. Cool the biscotti completely.


3 Comments

Posted by on March 23, 2011 in Baking, Chocolate


Tags: , , , , , , , , , , , , ,

Thick & Rich Chocolate Pudding Recipe

Dry ingredients for a Wacky Cake - ingredients...

Image via Wikipedia

We are guilty as charged: “TheshoeboxKitchen doesn’t do enough chocolate!”

Well, we hope that the velvety chocolaty richness left in your mouth after trying this pudding will be enough to post our bail until we can backfill the chocolate deficiency in our recipe archives with some of your own suggestions.

Okay, on to the pudding!  What is a pudding, anyway?  How is it different from a custard?  What differentiates a pudding from a mousse?  If you’re asking similar questions, then we’re right there with you.  So many pudding recipes call for cornstarch as a thickening agent, other recipes look more like a custard, relying on the proteins in egg yolks to cause the pudding to set.  Still others use both egg yolks and cornstarch.  And then there’s mousse – let’s not even go there right now.

We were going for a rich pudding, so we knew we wanted to use egg yolks.  But some recipes we found that depended solely on egg proteins to thicken the pudding were accompanied by comments suggesting that the pudding ended up runny or that folks had difficulty getting it to set.  So we decided to throw in some corn starch as well, just to be safe.

What we ended up with is some combination of a David Lebovitz custard-based chocolate ice cream recipe and a Food52 finalist’s pudding recipe.

Thick and Rich Chocolate Pudding

  • 2 cups heavy cream
  • 1 cup half & half
  • 3 tablespoons unsweetened cocoa powder
  • 1/2 cup granulated sugar
  • 1 vanilla bean
  • 1/8 teaspoon salt
  • 5 egg yolks
  • 3 tablespoons corn starch (less if you don’t want it as thick)
  • 5 ounces bittersweet chocolate

Split the vanilla bean lengthwise and scrape out the seeds into a bowl with the sugar.  ”Chop” up the seeds so they are as distributed as possible (not clumped together) throughout the sugar.

Measure out the cocoa powder as well.

And go ahead and set aside your 5 ounces of chocolate.  We used chips because they melt efficiently.  If you buy bars of chocolate, cut them up into small pieces.

Now pour into a medium saucepan the heavy cream and half & half (or milk, if you’d like a lighter pudding).  Add to this liquid the vanilla seed & sugar mixture as well as the cocoa powder.  Throw the vanilla bean husk in there too, just for good measure.  Whisk everything together and then warm over medium-low heat, whisking occasionally.

While the cream mixture is heating on the stove, whisk together the egg yolks until they are pale yellow, then add the corn starch and whisk until the yolks and starch are well-combined.

When the cream mixture starts to steam slightly and form little bubbles (about 175 degrees), remove it from the heat and remove a ladle-full of the warm liquid.  Slowly pour the warm liquid from the ladle into the egg yolks, whisking the yolks continuously.  Then, transfer the now-warmed egg yolk mixture back into the original saucepan, whisking the contents of the saucepan continuously.  Continue to whisk the custard mixture (yes, this is essentially a custard with cornstarch added) until the mixture reaches about 180 degrees.  Do not let the mixture boil or you’ll have scrambled egg pudding.

When your mixture hits 180 degrees, remove it from the heat and pour it through a strainer into a separate bowl.  Now dump in the chocolate and continue to whisk until all of the chocolate is melted, leaving you with smooth, velvety perfection.

Now, if you want to get fancy,  dump that velvety perfection into your food processor and process for about a minute.  This tip comes from Dorrie Greenspan, and results in a silkier, slightly airier pudding (i.e., more perfect than before).  We thought this step made the texture a bit closer to mousse (not as airy as mousse, but silky like mousse), which we were very happy to discover.

Pour the pudding directly from the food processor into small bowls or ramekins.  Be timid with the portions – this stuff is rich!

Oh, and if you’re not a fan of pudding skin, immediately place plastic wrap over and on the surface of the pudding.  Let the pudding cool in the fridge for at least three hours, or overnight. (Editor’s note: We’ve actually found that we prefer this pudding just slightly chilled; so, if you have refrigerated it, take it out and let it sit on the counter for at least half an hour before digging in – if you can wait!)

This pudding is very smooth and stick-to-a-spoon thick.  It is rich, but not too sweet, has just the right amount of chocolate flavor, and the vanilla undertones from the fresh vanilla seeds add an extra layer of depth.  If you love chocolate, well, this one is a no-brainer.

What other chocolate dessert should we try?  Before you close this window, add a comment below and tell us what we should make next!


Source: http://theshoeboxkitchen.wordpress.com/2011/03/07/chocolate-pudding/


Leave a comment

Posted by on March 23, 2011 in Baking, Chocolate, Sweets


Tags: , , , , , , , , , , , , , ,

Lazy Day Pot Roast Recipe

A bottle of Worcestershire sauce.

Image via Wikipedia

On Sundays, I usually make ‘mega-meals’ which means a meal that is bigger than for the two of us. It’s a meal to split three ways – for us, for his parents and for my parents. Both our parents are aging and while they get “Meals On Wheels” – it gives me great pleasure to give them a homemade meal each week.

I’m am sharing with you the most incredible, flexible pot roast recipe EVER! Seriously, this recipe gives you the guidelines and basics…all you do is fill in the blanks with different, spices, fluids and herbs. I have had so much fun playing with this recipe. When I’m in the creative, exotic mood – I play with Chinese Five Spice and cinnamon in the flour mixture to get exotic depth of flavors.

This time I took the lazy way out for I didn’t want to spend much time in the kitchen…would rather spend it with my hubby. Today’s pot roast interpretation is the “Lazy Day” version.

I found the recipe on Epicurious.com and it is dated from 1963. Time tested for sure. Over the years, I have had fun playing with all the options.

I start with a basic flour dredge of 1/4 cup flour, 2 tbsp. Montreal Steak Seasoning and a good hefty shake of Lawry’s seasoned salt.

I had a 3 1/2 lb. chuck roast from a special at a local grocer. It was a bit fatty so I carved off all visible signs of the nasty stuff.

Before diving in and braising the beef, I prepared all the veggies that were going to go in to the pot. This time I used onions, garlic (lots of it!) and carrots. The recipe is so flexible that you can add your favorite veggies – I’ve used turnips, fennel and mushrooms in the past.

Speaking of carrots, I don’t skimp on fresh veggies – lazy day or not. I always buy a bunch of carrots with tops attached…fresh and full of flavor…and oh so pretty!

Next step is to line up your herbs and spices. Again, this recipe gives you lots of room for creativity! Today, I’m going the rosemary (2 sprigs), Worcestershire sauce (1 TBS)  and bay leaf (2) route. There are so many variations of spices to play with…I like to go into the reviews of the recipe and see what other cooks have come up with.

A moment of digression here, I have the pleasure of having a delightful little spice shop near my house and I have sworn never to buy grocery store spices again!

Fresher!

Cheaper!

I love my visits to Heather’s and my chats with the owner over recipes…(another blog post for sure!)

Back to the recipe.

Veggies cut. Spices, herbs and seasonings lined up.

Time to braise the meat.

High temperatures. Frying pan. Canola oil.

Brown the meat on both sides until you get a nice crust on the meat.

Remove the meat from the frying pan, drain the excess oil and immediately throw in the veggies.

I add some fresh ground pepper, turn the heat down a bit and stir the veggies so they collect what’s left of the drippings from the beef in the pan. After a few minutes, I toss in a cup of red wine!

Stir the veggies and wine to collect all the flavors and toss it all over the braised meat in a dutch oven or roaster.

This is a LOW and SLOW recipe – better cooked at a low temperature of 300 degrees for 3 1/2 to 5 hours. Check the meat and when it falls apart with a fork, it’s done.

While it’s cooking, enjoy the smells that will permeate your kitchen…and enjoy your lazy day!

Source: http://akitchenmuse.wordpress.com/2011/03/14/lazy-day-pot-roast/


Tags: , , , , , , , , , , ,

Dark and White Chocolate Cherry Bars Recipe

A pair of cherries from the same stalk. Prunus...

Image via Wikipedia

The count down is here! Only two more days until spring break. Boy, am I ready. As I count down the days, I become more and more anxious for the sun, it’s warmth and, most of all, at least a short break from school. There are a lot of really great things about school, but after the last month, which has been charging ahead like a bull chasing a bull fighter, my brain is feeling a bit fried… and while some things, like beignets, doughnuts, and french fries are better fried, my brain is not. This will be a much needed week of rejuvenation.

We are starting the celebrating early in this house hold with these little gems: Dark and White Chocolate Chip Cherry bars. Every cherry is like a little spot of sunshine! These pictures are of the few remaining bars left- anything with cherry, or chocolate, not to mention both, will have a very short life span in this house. (Self control? What’s that?)

I know this spring break is going to be a good one. How could it not be? I’ve got chocolate and cherries on my team (in a bar!!).

Happy Spring! (Can you believe it’s here already? Where is 2011 going?!)

Ingredients:

1 cup butter, softened

1 3/4 cup all-purpose flour

1/4 cup rolled oats

1 teaspoon vanilla

1 cup dark brown sugar

1/2 teaspoon salt

1/2 cup semi-sweet chocolate chips

1/2 cup white chocolate chips

1/2 cup dried cherries (cranberries also work and are easier to find- look for cranberries that have been dehydrated with cherry juice to maintain the cherry flavor)


Preheat the oven to 350 F.

Cream together the butter and sugar with an electric mixer.

Add in the vanilla.

Mix in the salt, flour, and oats. The dough will have a consistency similar to shortbread dough.

Mix in the chocolate and cherries. Press the dough into a 9 x 9.

Bake for 12-15 minutes. Allow to cool.

Cut into bars.


Source: http://lacasitainspirada.wordpress.com/2011/03/15/dark-and-white-chocolate-cherry-bars-key-to-a-happy-spring/


1 Comment

Posted by on March 23, 2011 in Baking, Candy, Chocolate, Dessert, Fruit, Sweets


Tags: , , , , , , , , , , , , , ,

Chocolate Cupbread Recipe

White chocolate is marketed by confectioners a...

Image via Wikipedia

So while everyone needs no introduction to the universally celebrated cupcakes, i shall present cupbreads!

Here in Indonesia, these breads are known as “bloeder”, or sometimes spelt as “bluder”. And I am guessing, from its name, it is probably western influenced. These breads are very much like French Brioche, without small head of a dough on top of it.

Similar to the brioche, the bloeders is very high in both butter and egg content, they are indeed very rich and tender crumbed. I don’t even think you need to chew on these. Besides butter and egg, these bread are also very high in sugar content, which makes it pleasantly sweet tasting even when eaten on its own. But having said that, still, i have decided to fill them up with a generous chunk of milk chocolate. Because really, since i am already eating something sinfully delicious, why not go all the way? LOL

The proofing time for this bread takes a wee bit longer than usual. I suspect it might be because of all that butter and sugar, which might dampen the yeast activities. The total proofing time for this bread was about three hours, and in my tropical weather, that’s considered very, very long.

The dough for these bloeders are also quite different from the dough i am used to. Being high in butter content, these breads are very slimy. My hands kept sliding off the dough as i tried to knead it. Sealing the chocolate chunks within the dough was also not easy with the grease coating all over the dough.

As for the texture of the final product, these breads are so fluffy that you tear a huge chunk off these bread, thinking you will get full after a few mouthful, but in reality, being voluminous looking because of air, these bites just dissolve into nothingness.And you risk looking like a glutton when u reach for your second piece.

I also think i might have overbaked this dough as it turned out quite dry and crusty at the sides, and i must definitely keep closer watch over these next time!

Chocolate Filled Cup Breads

Recipe from an Indonesian cookbook “Roti sisir & Roti Sobek” by Lanny Soechan

15 egg yolks

250 gr granulated sugar

1 kg bread flour

20 gr instant yeast

50 gr milk powder

300 ml fresh milk

250 gr butter

1 tbs salt

some chocolate chunks

some evaporated milk

some chocolate chips

1. Beat egg yolks and sugar till it thickens and turns pale yellow

2. Combine flour, yeast, and milk powder. Add in the egg yolk mixture gradually and stir till well combined.

3. Add in the fresh milk, salt, and butter. Knead till elastic

4. Leave to proof till double in size

5. Punch down dough, cut and weigh each dough to be about 60 gr. Wrap the chocolate chunks within each dough and drop them into papercups. Let it proof a second time till double in size.

6. Brush the surfaces with evaporated milk and sprinkle some chocolate chips.

7. Bake at 160 degree celcius till the surfaces turn a nice golden brown.


Source: http://crustabakes.wordpress.com/2011/03/19/chocolate-cupbread/

 
1 Comment

Posted by on March 23, 2011 in Baking, Bread, Chocolate, Dessert, Sweets


Tags: , , , , , , , , , , , ,

THYME ROASTED BABY BEETS WITH MINT VINAIGRETTE RECIPE

Mangelwurzel

Image via Wikipedia

It started simply enough.  Innocently enough.

Somehow, someway, somebody snuck not one, not two, but three bunches of baby beets into our home.  Given the fact that I’m a lifelong, card carrying member of the N.A.B.A., otherwise known as the National Anti-Beet Association, I knew the ‘somebody’, was certainly not me.

Growing up, I believed beets were served and eaten one, and only one way:  out of an aluminum can packed by the folks who lived in a town called Del Monte. Those fine folks made fruit cocktail, too.  Even as a little girl, beets were horribly off-putting to me.  To be honest, they scared the bejesus out of me. The gelatinous texture, the pungent smell, the unnameable taste, and an alien color which didn’t match any in my sacred box of 64-Crayola Crayons, the bible of all things pigmented and pretty.

Since then, I’ve had a rather turbulent on-again, off-again relationship with beets.  Every time I think I can commit to a bigger bite, I back off.  And RUN.  With 3 bunches of beets at my mercy, I was in a conundrum.  “Take one more chance on us”, I hear them say. “We promise this time it’ll be different”.  How many times had I heard that before?  Reluctantly, I put them back in the fridge (instead of in a bag on my neighbor’s doorstep) and with no other N.A.B.A. members in sight to commiserate with, I head to the bookstore for an afternoon distraction.

Lo and behold, THE beet recipe of all beet recipes lands in my lap.  Thyme Roasted Baby Beets with Mint Vinaigrette.  THE beet recipe which, in an insanely delicious, hocus-pocus, abracadabra instant, converts me from beet basher to beet worshipper.  Just like magic.  Just like that.  Yes, roasted beets are a now a weekly staple and somebody is very happy about it.

Make sure to use an assortment of beets, not just the old familiar red ones.  Not only are golden and chioggia beets gorgeous to look at, they add a subtle nuance of sweetness to the final dish.  If I can’t make to the farmer’s market, I like buying my beets in the loose bulk bin at Whole Foods.  I can pick and choose the exact mix I want and get only as much as I need for that evening (plus, it costs less than buying them in full bundles).  If you have trouble finding baby beets, medium ones are dandy.  Slice them in half before cooking.  For larger beets, slice into quarters.  Just make sure all pieces are more or less the same size to ensure even cooking.

And whatever you do, DO NOT, I repeat, DO NOT leave out the fresh mint.  This dish without the mint is like a crème brûlée without its heart-stopping crackly top.  It just wouldn’t be the same without it.

Adapted from Harvest to Heat


Source: http://kissmyspatula.com/2011/02/09/thyme-roasted-baby-beets-with-mint-vinaigrette/


Leave a comment

Posted by on March 23, 2011 in Vegetables


Tags: , , , , , , , , ,